Freshman Rider
 
Currently Offline
Posts: 93  Likes: 1
Joined: May 3, 2014 8:58:49 GMT -5
|
Post by dev150cc on Oct 9, 2019 0:40:49 GMT -5
My first guess would be that the fuel valve is not getting good vacuum. IE you have a vacuum leak. I would target this first. And check all the vaccum hoses to see if they are deteriorated. You can find youtube videos for how to test a fuel petcock.
|
|
Freshman Rider
 
Currently Offline
Posts: 93  Likes: 1
Joined: May 3, 2014 8:58:49 GMT -5
|
Post by dev150cc on Apr 8, 2015 20:30:07 GMT -5
Hey Joel, welcome. I'm in San Jose. You may need to do a little research and take an extra day to find what you need.
Dan
|
|
Freshman Rider
 
Currently Offline
Posts: 93  Likes: 1
Joined: May 3, 2014 8:58:49 GMT -5
|
Post by dev150cc on Aug 13, 2014 0:19:46 GMT -5
JR, I've read a bunch of your posts as I've come into the scooter world. Good to see your around still.
Soak all that family time in and take lots of pics. The kids will grow fast and it will be a bunch of great memories some day. Good of you and your wife to show them a good life, growing veggies, going to school, athletics, and so on. They'll be well balanced for it.
I spent 3 hours in the kitchen making blackberry and apricot preserves this weekend. I can't imagine 12 hours - my dogs were tired!
Welcome back.
|
|
Freshman Rider
 
Currently Offline
Posts: 93  Likes: 1
Joined: May 3, 2014 8:58:49 GMT -5
|
Post by dev150cc on Aug 9, 2014 1:11:33 GMT -5
You're right - I used bad verbage there. I was referring to raising the needle by *lowering* the clip. I should have called that out more clearly.
|
|
Freshman Rider
 
Currently Offline
Posts: 93  Likes: 1
Joined: May 3, 2014 8:58:49 GMT -5
|
Post by dev150cc on Aug 9, 2014 0:57:54 GMT -5
Ok, that helps me understand what I experienced. I adjusted multiple times on a long ride. It was in the 3rd/middle notch stock. So I raised it one notch. Ok, no problem. Then for comparison, I went the other way and lowered it one notch from middle - definitely a little lean. Returned it to middle just to cleanse the pallet. then finally raised it again one notch to see if it was my imagination. Seems just right.
I have a tach I ordered (my bike doesn't have one). I really need to put it on and see what kind of rpm's I'm running. Just ordered some 11g rollers (I have 12g's on there presently).
|
|
Freshman Rider
 
Currently Offline
Posts: 93  Likes: 1
Joined: May 3, 2014 8:58:49 GMT -5
|
Post by dev150cc on Aug 8, 2014 23:55:39 GMT -5
Jerry, you were right - raising the needle one notch gave me a tad more smooth power in the midrange (with the 115 main jet). Makes me wonder what it would be like changing the main somewhere between a 115 and 120 (do they make a 117.5?)
Anyhow, I'm pretty pleased and will order the next lighter sized rollers to test variator tweaks further now.
|
|
Freshman Rider
 
Currently Offline
Posts: 93  Likes: 1
Joined: May 3, 2014 8:58:49 GMT -5
|
Post by dev150cc on Aug 8, 2014 17:42:34 GMT -5
At lower speeds, the 120 (even the 125 to some extent) was fine. I just couldn't get beyond medium speeds (say > 35mph) without it just bogging and choking. So the main jet will stay at 115. Overall, I think it's pretty happiest there.
Now.... you got me thinking the other day. I'll see if I can raise the needle a notch to see if I can make the mids just a bit more responsive. Not that it's bad, but if I can finer tune that, then I may not even go to the next lighter rollers.
|
|
Freshman Rider
 
Currently Offline
Posts: 93  Likes: 1
Joined: May 3, 2014 8:58:49 GMT -5
|
Post by dev150cc on Aug 7, 2014 1:39:27 GMT -5
Hey there. It was idling fine, a little low, but not by much. It would just bog at 1/2 to full throttle. Ok up to that point.
But no, I didn't mess with the needle.
|
|
Freshman Rider
 
Currently Offline
Posts: 93  Likes: 1
Joined: May 3, 2014 8:58:49 GMT -5
|
Post by dev150cc on Aug 7, 2014 0:16:09 GMT -5
Well, I tried the 120 for three miles and it really ran boggy like the 125 did. I put the 115 back in and it's happy again. It'll stay. I dabbled with the fuel mix and it seem happiest right about the 2.5 out point. Moving on...
Variator weights. I may try some 11's to replace the 12's, just to see if there is a marginal difference. And then may opt for sliders instead of rollers. may even try 12 rollers.
I bought all sort of LED lights lately for front and back. I'll tackle that after performance is optimized.
I checked the battery out after I killed it dead by leaving they key on. It's the original form when it was sold in 4/2013. It survived my accident, and me killing it, and charged up fine. It's holding about 12.78 volts. Also gave me a chance to check my charging voltage while running - right at 14.03 volts.
|
|
Freshman Rider
 
Currently Offline
Posts: 93  Likes: 1
Joined: May 3, 2014 8:58:49 GMT -5
|
Post by dev150cc on Aug 2, 2014 16:16:35 GMT -5
Ok, I've got the exhaust mods in place (made a baffle) and now on to carb tuning. This thread is just for my own reference, but I'd enjoy company if you want to play along, offer advice, etc. This bike originally came with a 102 main jet. Way too lean, so I put in a 115 and have been driving that for a hundred miles or so. Definitely an improvement, but I feel like it's still not quite there, and the plug was still not giving me a decent tan. The holy grail I'm looking for is that coffee colored insulator tip. Today I swapped the 115 for a 125 and it ran like poo. Boggy and wouldn't get up to speed over about 2 miles around the neighborhood. I'm not surprised by this, but I wanted to find out how much was too much. 125 is too big. The insulator tip of the plug has the black soot you can see in the pic, but only on one side, and not too heavy. It reminds me off fireplace soot. The other side of the core is white. The black soot is dry, not wet. I did adjust the air/fuel mix screw to where it ran best. Here's the plug: 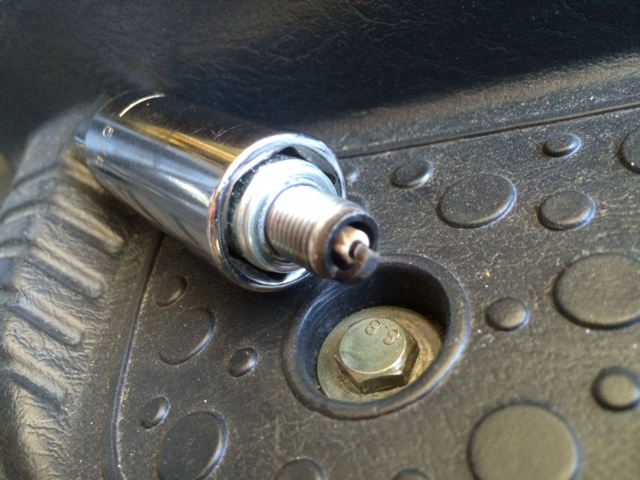 The shop I went to didn't have any 122's, but I have a 120. I'll drop that in there with a new plug and see how the plug reads. I'm betting it gets me closer to a healthy coffee color. More to come... |
|
Freshman Rider
 
Currently Offline
Posts: 93  Likes: 1
Joined: May 3, 2014 8:58:49 GMT -5
|
Post by dev150cc on Jul 30, 2014 13:55:26 GMT -5
Leo you're reading my mind. I was thinking of trying sliders to get that in-between rpm, but I may just do the mix-and-match. It's pretty darn close right now, and so this would be tweaking for the fun of it.
|
|
Freshman Rider
 
Currently Offline
Posts: 93  Likes: 1
Joined: May 3, 2014 8:58:49 GMT -5
|
Post by dev150cc on Jul 24, 2014 23:08:01 GMT -5
Success!
Initial fire-up: a bit more muted than I thought it would be - about as loud as stock, but a smidge beefier. Took it for a ride for a few miles. The steel scouring pad start getting forced out of the 5/8 inch exit washer.
Changes: I removed the scouring pads altogether. Almost back to the original sound level, but not quite - loud enough to get someone's attention but not as obnoxious as it was before. I also need to tack weld the exit washer or remove it altogether. It's rattling around a bit in there.
I'm happy and learned something new. I'll put some miles on it and do an inspection. If I find failures, I'll rebuild with welds everywhere possible. Otherwise I'm happy. Effective and overall easy.
Now, on to carb tuning and maybe try one size lighter variator weights for a little more umph - it's taking a while to hit the power band. Got 12g's on there right now. I'll try 11's. 13g's were a bit boggy.
|
|
Freshman Rider
 
Currently Offline
Posts: 93  Likes: 1
Joined: May 3, 2014 8:58:49 GMT -5
|
Post by dev150cc on Jul 24, 2014 12:57:58 GMT -5
Thanks for the analysis Leo. I've read your header posts before too and thought about that. When the time comes to take the header off, I'll be doing the chamfering.
I'll probably tack weld where possible and try to eliminate a couple of those bolts just to remove and possibility of something coming loose. This version is a "beta" to see how it works. I could also use some time to practice my stick welding skills. Heat expansion and vibration will eventually cause something to come loose. Thought about using rivets too perhaps.
The steel scouring pads provide a slight reduction in air flow, judged by me taking a big breath and blowing through the end. But it's comparable to the flow rate I felt when blowing through the stock muffler too, so at least no loss there, at least using a rudimentary test.
|
|
Freshman Rider
 
Currently Offline
Posts: 93  Likes: 1
Joined: May 3, 2014 8:58:49 GMT -5
|
Post by dev150cc on Jul 24, 2014 0:43:13 GMT -5
I received my scooter back this past week from the repair shop after I was hit from behind. The original muffler was scratched and scraped, so I had a new muffler put it. Sounds good and throaty, but it's just too loud. It did not come with a baffle, so I got to thinking about how to make one. The tip angles downward such that it would not be possible to install a baffle one from the exit point of the muffler. So I had to find a way to mount one to the inside of the tip and bolt it in place with the tip removed from the muffler. I scoured the web for various ideas on how to go about doing this without a lot of welding - as you'll see, below, I'm not much of a welder. I went with the idea of using two 5/8 inch washers on each side of the baffle filled with stainless steel cleaning pads. The idea is to provide a more restricted exit from the muffler via the 5/8 inch washers (there is no reducing mechanism within the muffler - it's about 1.5 inches in diameter on both the entry and exit, straight through). And also to reduce some of the blapping loud noise when I open it up. I cobbled a few items at home depot to create the baffle cannister - a six inch piece of fence top rail sleeve with one of the 5/8 inch washers welded on one end. Then an electrical conduit coupling that fit well with the fence rail sleeve. Drilled a few holes to pair the two up, and the electrical coupling bolted to the tube inside the muffler tip. Here are the pics. I'm curious if there is any danger of the bolts or washers joining the pieces rattling loose and making their way down to the engine and causing a problem. Feel free to critique and express any concerns. It's not mounted yet, so I can fix anything that stands out as a danger or other notable issue. Conduit coupling: 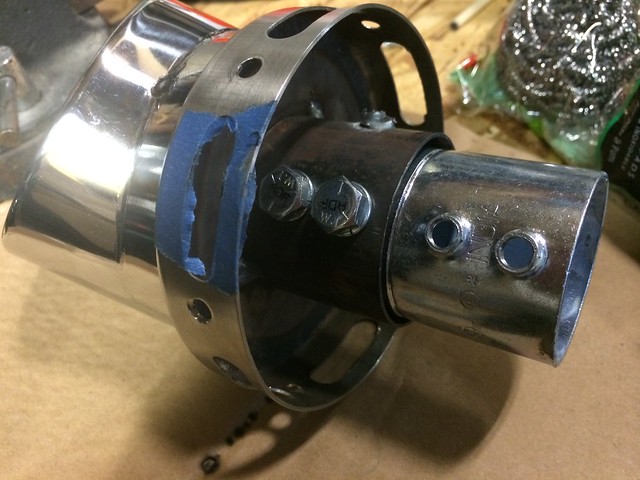 5/8 inch washer fit perfectly at the end of the exit of the tip. The conduit coupling holds it in place perfectly: 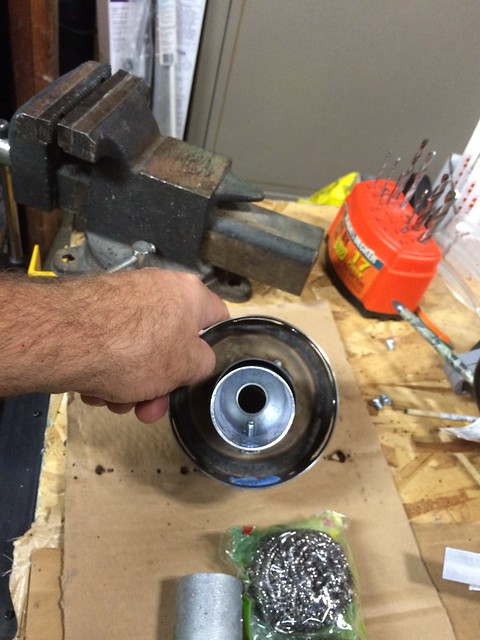 The rest of the bits prior to assembly. Note a 5/8 washer tacked onto the end of the fence sleeve: 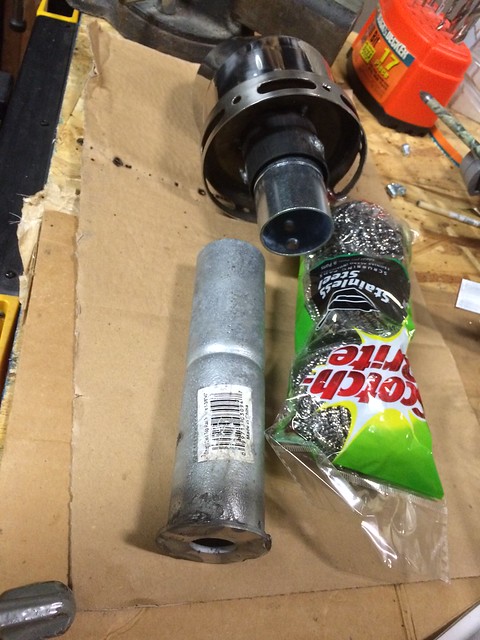 Assembled: 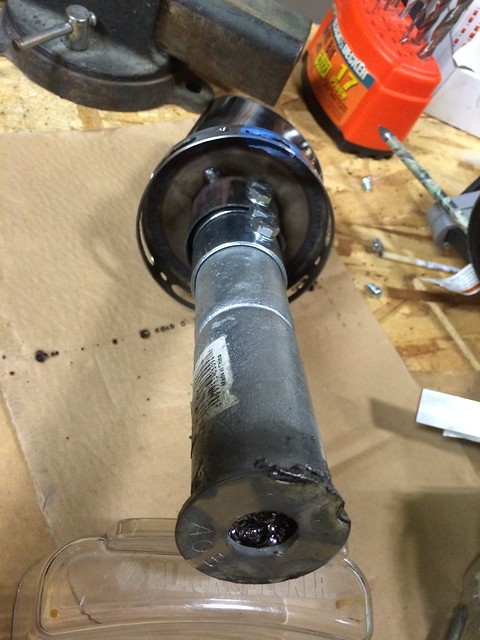 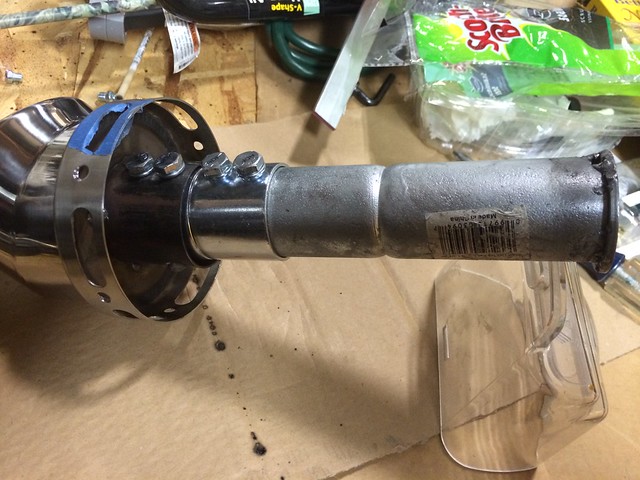 |
|
Freshman Rider
 
Currently Offline
Posts: 93  Likes: 1
Joined: May 3, 2014 8:58:49 GMT -5
|
Post by dev150cc on Jul 2, 2014 1:13:07 GMT -5
Welcome to California. Oh wait, I think if you don't have a manu cert, you're just screwed in CA.
|
|

