Freshman Rider
 
Currently Offline
Posts: 93  Likes: 1
Joined: May 3, 2014 8:58:49 GMT -5
|
Post by dev150cc on Jul 24, 2014 0:43:13 GMT -5
I received my scooter back this past week from the repair shop after I was hit from behind. The original muffler was scratched and scraped, so I had a new muffler put it. Sounds good and throaty, but it's just too loud. It did not come with a baffle, so I got to thinking about how to make one. The tip angles downward such that it would not be possible to install a baffle one from the exit point of the muffler. So I had to find a way to mount one to the inside of the tip and bolt it in place with the tip removed from the muffler. I scoured the web for various ideas on how to go about doing this without a lot of welding - as you'll see, below, I'm not much of a welder. I went with the idea of using two 5/8 inch washers on each side of the baffle filled with stainless steel cleaning pads. The idea is to provide a more restricted exit from the muffler via the 5/8 inch washers (there is no reducing mechanism within the muffler - it's about 1.5 inches in diameter on both the entry and exit, straight through). And also to reduce some of the blapping loud noise when I open it up. I cobbled a few items at home depot to create the baffle cannister - a six inch piece of fence top rail sleeve with one of the 5/8 inch washers welded on one end. Then an electrical conduit coupling that fit well with the fence rail sleeve. Drilled a few holes to pair the two up, and the electrical coupling bolted to the tube inside the muffler tip. Here are the pics. I'm curious if there is any danger of the bolts or washers joining the pieces rattling loose and making their way down to the engine and causing a problem. Feel free to critique and express any concerns. It's not mounted yet, so I can fix anything that stands out as a danger or other notable issue. Conduit coupling: 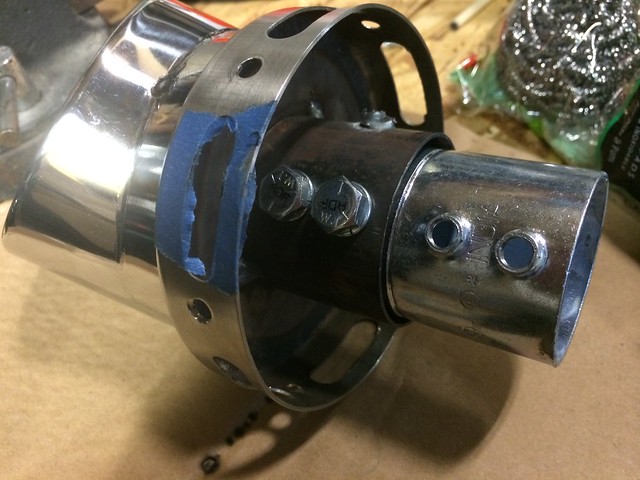 5/8 inch washer fit perfectly at the end of the exit of the tip. The conduit coupling holds it in place perfectly: 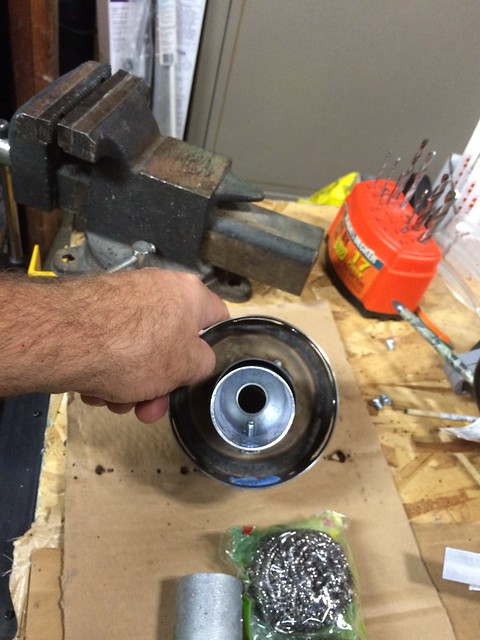 The rest of the bits prior to assembly. Note a 5/8 washer tacked onto the end of the fence sleeve: 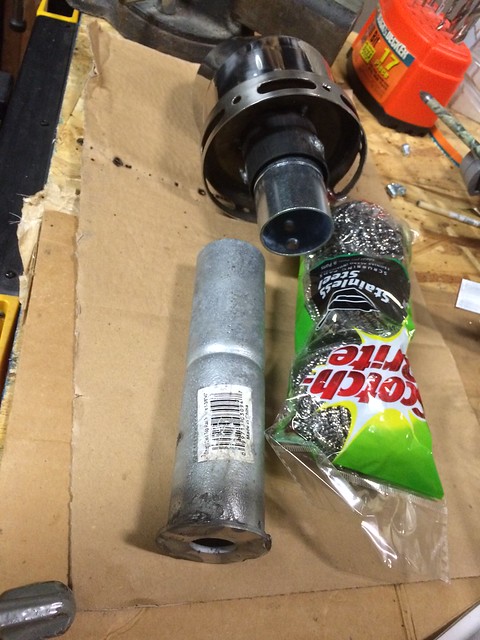 Assembled: 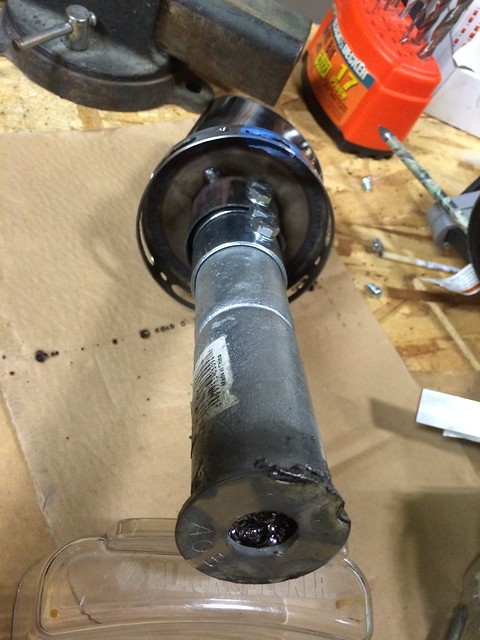 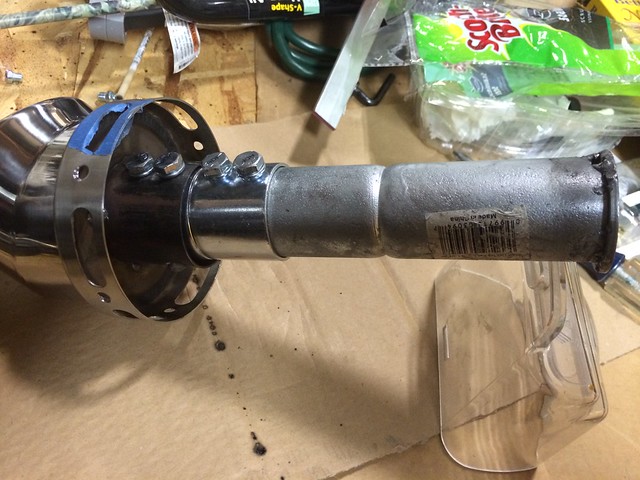 |
|
|
|
Post by oldchopperguy on Jul 24, 2014 12:18:41 GMT -5
I think you have a winner here!
I did extensive exhaust work on my old Xingyue 150 a few years back. I found that so long as the MUFFLER is not overly restricted, it doesn't make a lot of difference in performance. However, the HEADPIPE inside-diameter DOES seem to make a lot of difference.
On most Chinese GY6 150's, the HEADPIPE is actually SMALLER inside-diameter than the EXHAUST PORT. A very BAD design... Replacing the headpipe with a full-diameter unit makes for smoother running, and easier tuning. Those large-diameter headers are usually stainless-steel, and, usually pricey... But you CAN make a big improvement simply by "chamfering" the stock header where it meets the head. A "bevel" to the opening to guide the exhaust-gases into the smaller pipe is a lot better than the exhaust-gases hitting a right-angle restriction right at the exhaust-port where it causes the most restriction.
I would put heavy-duty thread-locker on your nuts and bolts inside they muffler, just to be safe. They do vibrate and get hot. That CAN loosen things. Or, just do a tack-weld on them to make them "permanent".
This is a nice how-to, with good pix! Thanks for posting!
Leo in Texas
|
|
Freshman Rider
 
Currently Offline
Posts: 93  Likes: 1
Joined: May 3, 2014 8:58:49 GMT -5
|
Post by dev150cc on Jul 24, 2014 12:57:58 GMT -5
Thanks for the analysis Leo. I've read your header posts before too and thought about that. When the time comes to take the header off, I'll be doing the chamfering.
I'll probably tack weld where possible and try to eliminate a couple of those bolts just to remove and possibility of something coming loose. This version is a "beta" to see how it works. I could also use some time to practice my stick welding skills. Heat expansion and vibration will eventually cause something to come loose. Thought about using rivets too perhaps.
The steel scouring pads provide a slight reduction in air flow, judged by me taking a big breath and blowing through the end. But it's comparable to the flow rate I felt when blowing through the stock muffler too, so at least no loss there, at least using a rudimentary test.
|
|
Freshman Rider
 
Currently Offline
Posts: 93  Likes: 1
Joined: May 3, 2014 8:58:49 GMT -5
|
Post by dev150cc on Jul 24, 2014 23:08:01 GMT -5
Success!
Initial fire-up: a bit more muted than I thought it would be - about as loud as stock, but a smidge beefier. Took it for a ride for a few miles. The steel scouring pad start getting forced out of the 5/8 inch exit washer.
Changes: I removed the scouring pads altogether. Almost back to the original sound level, but not quite - loud enough to get someone's attention but not as obnoxious as it was before. I also need to tack weld the exit washer or remove it altogether. It's rattling around a bit in there.
I'm happy and learned something new. I'll put some miles on it and do an inspection. If I find failures, I'll rebuild with welds everywhere possible. Otherwise I'm happy. Effective and overall easy.
Now, on to carb tuning and maybe try one size lighter variator weights for a little more umph - it's taking a while to hit the power band. Got 12g's on there right now. I'll try 11's. 13g's were a bit boggy.
|
|
|
|
Post by oldchopperguy on Jul 30, 2014 2:12:38 GMT -5
Success! Now, on to carb tuning and maybe try one size lighter variator weights for a little more umph - it's taking a while to hit the power band. Got 12g's on there right now. I'll try 11's. 13g's were a bit boggy.
About the variator weights... I had the EXACT same experience with my Xingyue 150. I found 13's much too heavy, and 12's still a tad heavy, BUT 11's WAY too light, cutting my top speed badly, and running too high an rpm. The ideal setup on my particular scoot, was a mix of 3 each 11's and 3 each 12's staggered.
I was using a Prodigy variator, but I think I'd have had the same experience with a stock one. It's OK to mix weights, so long as you stagger them for even performance. The mix of 3 11's and 3 12's gave me a "11 1/2 gram" which worked great: Fast acceleration AND high top speed. Just a HALF gram made a MAJOR difference.
Also, if you're riding with the belt-cover off to facilitate variator experiments, be sure to remove or secure the kick-starter pieces so you don't lose them on the road... LOL!
Ride safe!
Leo |
|
Freshman Rider
 
Currently Offline
Posts: 93  Likes: 1
Joined: May 3, 2014 8:58:49 GMT -5
|
Post by dev150cc on Jul 30, 2014 13:55:26 GMT -5
Leo you're reading my mind. I was thinking of trying sliders to get that in-between rpm, but I may just do the mix-and-match. It's pretty darn close right now, and so this would be tweaking for the fun of it.
|
|
|
|
Post by oldchopperguy on Aug 1, 2014 7:18:59 GMT -5
Leo you're reading my mind. I was thinking of trying sliders to get that in-between rpm, but I may just do the mix-and-match. It's pretty darn close right now, and so this would be tweaking for the fun of it. Dev150cc,
When I finally decided to trade up to a 250, I had just perfected the 150 to best it ever had run... (I figured that would be a good time... LOL!). Whomever bought "Lil' Bubba" off the dealer's lot got one SWEET Chinese 150!
I had fooled around with the rollers so much that I should have had the belt cover attached with Velcro... I also had 12 gram Dr. Pulley sliders on-hand, but never got to try them. From what I've heard, they are superior to rollers, allowing a FULL close to the variator for best top-speed, and, FULL opening for complete release at idle. Others also advised me that I might get best performance from 11 or 12 gram SLIDERS without mixing weights, as they perform better than rollers. Slightly heavy SLIDERS may still provide the fast acceleration of a lighter roller set, while also giving high top-speed through fully pinching the pulley halves. Sliders are DEFINITELY worth a try. Our 150's are SO close to being the ideal all-purpose ride, lacking ONLY a few mph of being freeway capable. I firmly believe the variator and roller/slider weights give the "most bang for the buck" in the 0 to 60mph game. But they must be accompanied by a good CDI, coil, and well-tuned carb... and preferably a free-flowing exhaust HEADER... The muffler is not as critical as the header, and your muffler mods should be just fine.
I don't know if mixing sliders is "OK" or not, but mixing roller weights works well. What I definitely DID learn however, was that going up or down a full gram is often too much. You may find using a mix of 11 and 12 grams works for you, or maybe 12 and 13... It depends somewhat on your weight. I'm fairly heavy at 235 pounds, so my scoot liked a tad lighter mix for acceleration. But a half-gram REALLY makes more difference than I would have imagined.
In my case, the vendor I got the Prodigy variator from 7 years ago, kindly included 11, 12 and 13 gram top-quality rollers with the variator! So it didn't cost me anything to "experiment". The factory rollers were pretty poor quality, and too worn and buggered-up to weigh accurately so I don't know what they were (other than "trashed")... LOL! Good rollers/sliders are NICE!
Modding the 150 can bring a lot of satisfaction, and sometimes can bring the top-speed to 60mph or a tad more... A LOT of bang for the buck! A whole lot! When I was young, back a half-century ago, we only DREAMED of having a scooter as good as the WORST of today's Chinese rides... REALLY!
Those old-school "turtledeck" scoots like yours are my favorite style. Sort of what I think of when I think of a "scooter" and they make FABULOUS "rat-bike" customs... Oh YEAH! Flat-black, whitewalls, red rims, open-bucket gauges and headlight, a little chrome and a splash of checkerboard trim... Be still my aged, beating heart... LOL! The Euro-scooter jockeys on tight budgets KNOW how to style a "hooligan scooter"... Cool as a high-buck chopper!
I see in your avatar that you already have the retro-Italian look down pat... Good choice!
But whatever else you do to the little guy, ENJOY the ride!
Best wishes on your project,
Leo
|
|

