|
|
Post by dmartin95 on Feb 10, 2015 20:50:04 GMT -5
The LED strip for the tail light is spliced into the tail light circuit. The radio is straight from the battery, via a relay activated by ignition.
The fact the tail light flickers even wiht the engine OFF is perplexing. rcq first Ill address the light strip.... If it's spliced into the tailight circuit, when the LED strip blinks/flickers, does the tail light also flicker? If they both flicker with the key off, it may be the case you have a faulty key switch (or bad connection like Alley suggest) ... If it's only the LED strip, it's possible that the device has capacitors that store a little bit of energy and what you see as a flicker is actually the caps discharging... -------------------------- The Radio.... Relays are activated by a specified voltage... Give it too many volts, it cuts out, to few, it cuts out..... What you're describing sounds like your regulator isn't doing it's job... When you go up in RPM's you increase the current, your R/R is designed to do 2 things, take that A/C current and convert it to usable DC, this is rectifier part, the other part takes that usable DC and regulates it, hence the regulator part... R/R... If the regulator isn't properly doing it's job, it will allow the voltage to spike or drop... Seeing as how your radio is dropping out when you increase RPM's that indicates when your stator starts pumping out juice, the regulator let's it and I suspect your voltage curve may be increasing with your RPM's, exceeding the relays tolerances, then shutting it off until the voltage comes back within tolerance. I suggest installing a volt meter, go driving and monitor your voltage. These kind of gremlins are very hard to diagnose without the scooter |
|
|
|
Post by dmartin95 on Feb 9, 2015 17:50:25 GMT -5
Hmmm, getting back to the original topic, i did forget one thing, gotta do something about this seat. The scooter stops, but i don't, which isn't good, and i keep forgetting to do something about it between rides. Any suggestions out there? I have wind breaker type of pants and they are so slippery on the Havoc seat.... I've worn other stuff, jeans, sweats it doesn't matter, the havoc seat is just too darned slippery!!! So far, I've just dealt with it, but there are options... Because our scooters are cloned after the Zuma, there's a great deal of after-market seat covers... Air Hawk is a nice brand but very, VERY expensive.... Anyhow, if ya search for Zuma seat covers you might find a solution to the slippery seat..... |
|
|
|
Post by dmartin95 on Feb 9, 2015 0:31:22 GMT -5
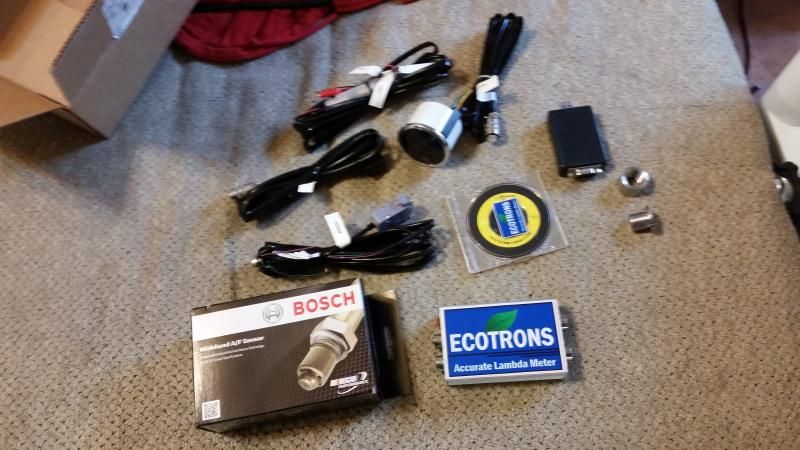
I am seriously jealous of your O2 sensor. What a great tuning and diagnostics thing you have there! Do you post on scooter.doc? The reason I ask is because earlier I posted a pic of my ecotrons on that site, not here.... Joeybee is the one that posted a pic of his installed O2 sensor, didn't know if you got us mixed up or not..... This is my setup. It's an ecotron's Wideband ALM-with gauge  Thing is, I wasn't planning on installing this o2 sensor on this particular scooter... But it won't hurt anything... More work, but better end result I suppose..... |
|
|
|
Post by dmartin95 on Feb 8, 2015 22:01:31 GMT -5
The opposite, Dan
A larger carb has a larger AIR opening. It may come with a larger jet or not.
But the larger AIR OPENING means a lower vacuum at the venturi (where fuel is sucked past the needle into the airstream). So, all other things being equal, you will need a LARGER jet in a larger carb than in a smaller carb to get the same mixture. You posted while I was posting..... That makes sense.......  |
|
|
|
Post by dmartin95 on Feb 8, 2015 21:54:13 GMT -5
There are so many variables in these scooters that I think anyone would be hard pressed to just call out a number unless they knew a whole lot about scooters and had actually tried dozens of configurations of rollers, springs, exhausts, intakes, etc. Yeah, I get that there's no crystal ball here.... I'm just confused because I'm getting conflicting info here and there.... This specific carb will be installed on a 180cc GY6.... It was listed for a 125/150 and the jet size is 40 pilot and 125 main... Is what's weird is that it came with two extra pilots... Not mains... Seeing as how it's listed for a 150cc, maybe they include those pilots because that's what needs to be tweaked... Or I could just be reading way too much into the accessories  ...... But why did they include those pilots? I think I'm over thinking this... I may just need to get a main and pilot jet set and tune away till I get it... I do have an O2 sensor.... It wasn't going on this build but I can use it just to calibrate the scooter then seal up the bung...  |
|
|
|
Post by dmartin95 on Feb 8, 2015 21:33:34 GMT -5
Wow gang! Thanks for the links and info, very informative..... I've considered the info that has been provided, read the links on jetting (thanks Jerry  ) ... When it comes to these carbs, the thing I'm still confused about, is this: When people mod their scoots with say, a BBK, UNI and a performance exhaust, they wind up "upjetting" or getting a slightly bigger carb,.... What I can't determine is what are the limits of "slightly bigger".... Actually, I would just like this explained: Is putting in smaller jets in a larger carb going to yield the same results as upjetting a smaller carb? If not why....====================== With all the info provided, one would think I could figure it out by now.... |
|
|
|
Post by dmartin95 on Feb 8, 2015 14:45:40 GMT -5
And wasn't i supposed to get some kind of road service card with the bike? Yes. Mine came with paper work when I bought my scooter. You should contact your dealer. If they can't (or will not) help you, you can always try bintelliscooters.com/ ... They have a live chat right on their main page. Nice looking scoot BTW! I like the blue! |
|
|
|
Post by dmartin95 on Feb 8, 2015 13:44:16 GMT -5
Hey, that's a very nice job! It looks stock and very clean!  |
|
|
|
Post by dmartin95 on Feb 8, 2015 12:30:58 GMT -5
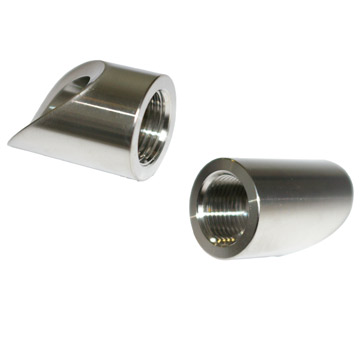
The EGR port runs straight along ground level. I was planning on cutting the tube off with just enough meat to thread a bung into for mounting the O2 sensor. They make 45 degree bungs just for O2 sensor mounting. There are cutoff ones like this for welding on:  And threaded ones like this that I was thinking of trying since I don't have a welding righ:  There are also  degree bungs, but I'm not sure I could make one fit: UE9s3wBnF5BQU6tzfD)Q~~60_58.JPG) If necessary, I'll ask a friend to weld one on, should cost me more than a 12 pack. If I can tap it instead, then I can plug it back up much easier if things don't work out. Jerry, if you're already going to have a friend weld it on, why are you bothering with the EGR port in the first place?  Just drill out a new hole and weld the bung on... Way easier than messing with that EGR port IMO. Those 45* look too long... They don't look like they would allow the sensor tip to get down into the exhaust flow.... |
|
|
|
Post by dmartin95 on Feb 8, 2015 2:36:06 GMT -5
Good luck Javarod!
|
|
|
|
Post by dmartin95 on Feb 8, 2015 2:06:31 GMT -5
Jerry, I would say that would be fine, as long as it's the right angle.You have to make sure the bottom-tip of the o2 sensor is pointing towards the ground... This prevents moisture from pooling on the sensor.... Your distance IMO is fine, just make sure orientation would be bottom of o2 sensor pointing downward. Thanks for the info dmartin95. Perhaps I could use a 45 degree bung, would that be pointed down enough? It would be easier than attempting an off angle tap. I did a double take of the pic you provided and it got me thinking, I'm not sure how well your plan would work, even using a *45...... When I first looked at your pic, I was thinking of just whacking the end off, low enough so the tip would be in your exhaust flow... thread it right into the pipe and not use a bung... Of course you need to know the diameter of the pipe, I can get ya measurements of the o2 sensors threaded area if ya need... The bung is just an exhaust port and you don't need it, you only need something to thread the o2 sensor into.... As far as adding to that pipe....Not so sure how well that would work... I would advise completely removing it, if, and only if, you feel confidant you can remove all the weld build up around the new hole... You will need a nice and smooth surface to have your bung welded to.... If I were you, I would start with getting a measurement of the diameter of that egr port.... Is it angled towards the ground? |
|
|
|
Post by dmartin95 on Feb 8, 2015 1:34:01 GMT -5
Over on the doc's site Cyborg started a thread showing what tools are used ( or rather, can be) for working on a GY6 motor. These are specific to the GY6. I made a video illustrating what tools I have accumulated thus far.... If you got GY6 specific tools, add 'em to this thread!!!  Also, my plan is here when the weather get's a little better I have a Bunch of GY6 work to do..... Engine builds are on that list. So, if ya watch my video and see any specialty tools I forgot, let me know..... |
|
|
|
Post by dmartin95 on Feb 8, 2015 0:59:22 GMT -5
Jerry, I would say that would be fine, as long as it's the right angle.
You have to make sure the bottom-tip of the o2 sensor is pointing towards the ground... This prevents moisture from pooling on the sensor....
I have Ecotrons o2 sensors... I haven't installed them yet but I have read the installation manual and know a fair bit on how and where, proper orientation to install them.... But reading is only one part, I can offer the experience from someone else:
Skip through it if ya want till you see where his o2 sensor is.... It's way beyond where ecotrons recommends installing but he's getting accurate readings... These GY6's have very small exhaust pipes and the same o2 sensor could be fitted on a 3" exhaust manifold for a car....
Your distance IMO is fine, just make sure orientation would be bottom of o2 sensor pointing downward.
|
|
|
|
Post by dmartin95 on Feb 7, 2015 9:37:03 GMT -5
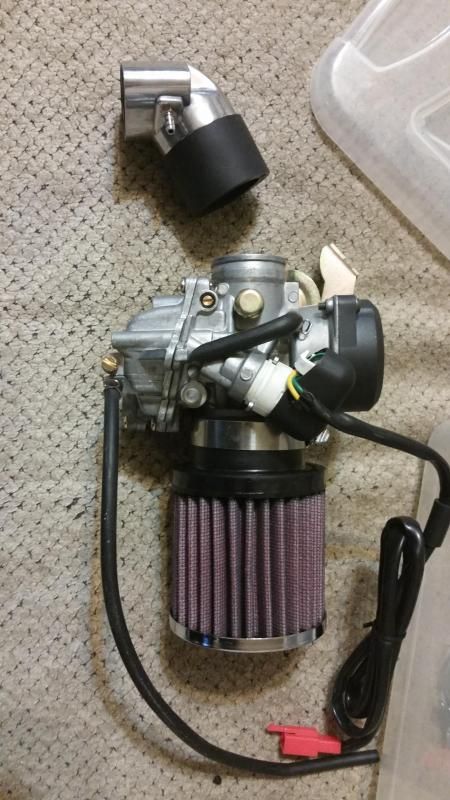
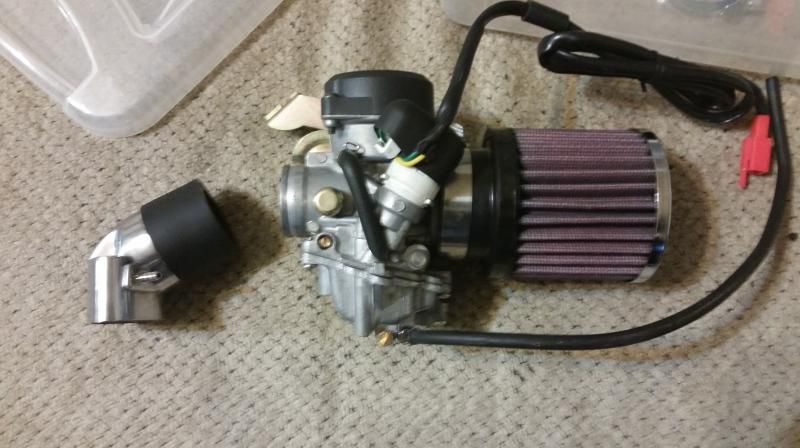
The other 28, 30 and 32mm carb thread keeps going towards rollers, sliders and springs.... Can we have one that only addresses using a large carb for a BBK? When it comes to the electrical system of the GY6, I've got it covered. When it comes to up-jetting and using a larger carb to accommodate other upgrades, I have a lot of learning left.... Now, I know enough to know there's no crystal ball here... So what I'm looking for it the proper way to tune a carb using the "jet" method... =============== I purchased a HOCA 30mm carb to go with a 180cc power kit... I'm concerned it may be too large in it's current configuration.... It has a #128 main and a #40 pilot... What I guess I'm looking for is some good tutorial videos or perhaps a walk-through on how to up/down-jet a carb Here's the carb I'm using, It's a HOCA 30mm, K&N air filter and aluminum intake.   |
|
|
|
Post by dmartin95 on Feb 5, 2015 23:34:51 GMT -5
Coming home from work on Dec 28th, I had a bad head-on. Kev Wow man, that's quite a crash! I'm glad you survived and thank god for helmets!! I hope you have a speedy recovery! |
|

