|
|
Post by JerryScript on Jun 2, 2015 19:38:57 GMT -5
No need to drain the oil unless you are splitting the case. You can leave it in when pulling the jug.
|
|
|
|
Post by ital on Jun 5, 2015 8:35:37 GMT -5
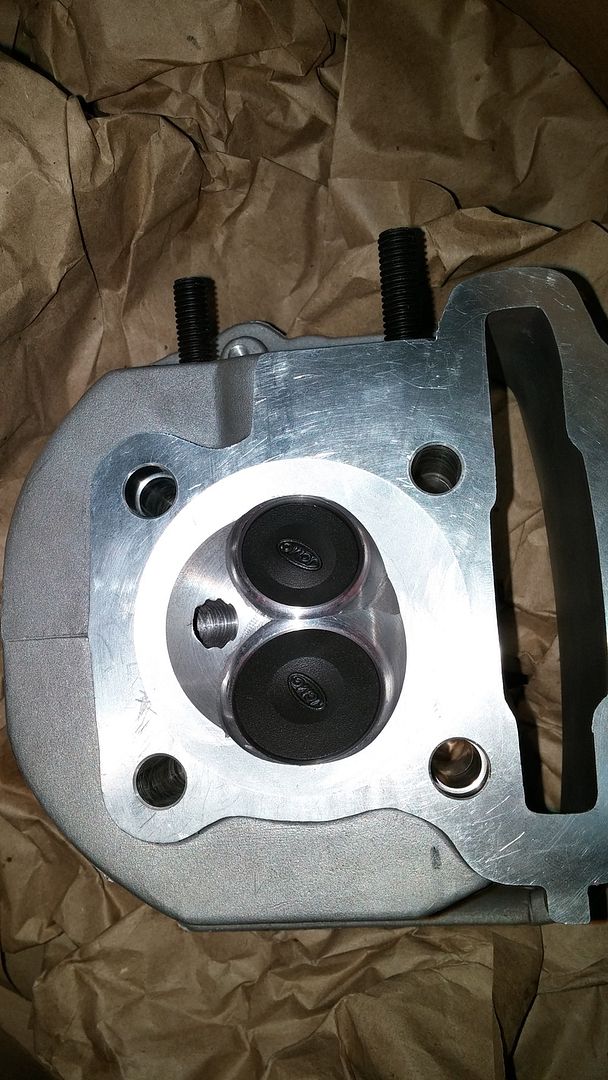
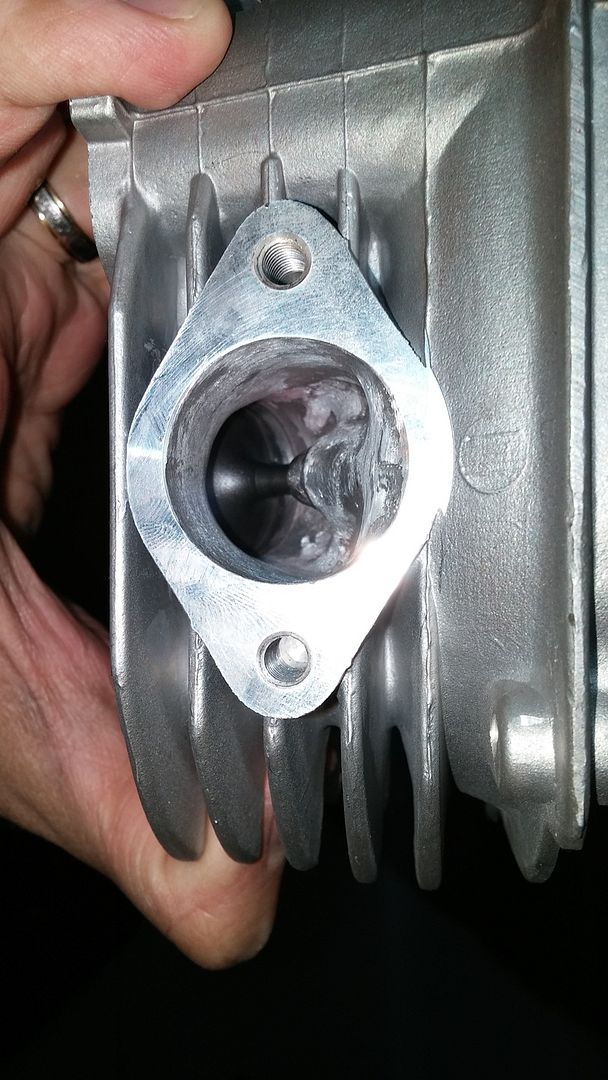
Hi guys quick update. I got everything off without having to take the engine out so that is great. I also got my head back. Please let me know what you guys think. they cleaned up the ports and lapped the valves.    |
|
|
|
Post by geh3333 on Jun 5, 2015 12:05:14 GMT -5
Not sure if its just the pic , intake and exhaust ports look pretty messy. The first pic looks pretty clean , but still not that polished. I'm curious what others think .
|
|
|
|
Post by geh3333 on Jun 5, 2015 12:11:24 GMT -5
The more I look , the more I have a problem with the exhaust port. There is no space for the donut type gasket now . I don't use one , but some use both types of exhaust gaskets. I really don't think they should have ported the exhaust port. They usually come big enough on the bigger heads. If the exhaust port is now bigger then the header diameter , it may cause some issue with the gasses escaping smoothly. I would have liked to see just a nice polish job on the exhaust port. I would have piked to see the lines smoothened out where the gasket sits also. I don't mean to be negative , I'm just a little concerned.
|
|
|
|
Post by ital on Jun 5, 2015 12:35:04 GMT -5
Thank George for you comments. I am not worried about the polishing part because it does not much for performance, it all for looks. Tonight when I am home I will take come more pictures with some measurements. I will also Measure my exhaust gasket and down\header pipe This clean up job was fairly inexpensive and should help a lot.  |
|
|
|
Post by ital on Jun 5, 2015 13:07:33 GMT -5
George, i think it is just the picture. the opening is just about the same. I will take a short video later to show it better.
|
|
|
|
Post by ital on Jun 8, 2015 14:37:17 GMT -5
ok, guys quick update. She is all put together for the most part a couple of more puzzle pieces are missing :-) I was missing exhaust stud bolts 8mm  I was able to get the carburetor to fit by using the NCY short intake manifold, however I cant connect it to my air filter. I bought a 2inch coupler today which I will use to connect the carb to my airbox, I also bought come bolts from home depot while I wait for mine stud bolts to come in.... If I am able to get the HD bolts on I will start her up today... How many miles should I put on her before first oil change? I am assuming its ok to let her run on the existing oil from before the upgrade it only has like 500 miles on it.... I was thinking on putting 50 to 100 miles and do the oil change, or should I let her run for a few minutes a do one immediately? I am expecting very big performance from these changes... I hope I am not disappointed  I am thinking at least 13 WHP, but I got no dyno... hahahaha |
|
|
|
Post by geh3333 on Jun 8, 2015 15:47:09 GMT -5
I would use new oil , but I'm sure it will be fine . I'd go on a 20 mile ride , then change the oil. After that you can go about 50 to 100 miles before the next change. The first couple changes are the most important . this is usually the time you'll find the biggest pieces of metal in the oil. If I remember correctly I changed the oil every 100 miles after the first 2 changes , up to 500 miles or so. I may have gone a little overboard , but its worth being safe.
|
|
|
|
Post by ital on Jun 8, 2015 23:48:30 GMT -5
JerryScript, ital, geh3333 so i put her all back together and i tried to start her but she would not start. I've changed a lot of parts and i put on the ncy 30mm carb as well. I am not sure if its a fuel to air ratio problem. I know the carb was empty of gas, but not sure how many tries would it take. I tried about 5 times enough to kill the battery and put my trickle charger on. anyway i am a noob at this. how many turns out should I set the air to fuel screw at first to get her started?
|
|
|
|
Post by geh3333 on Jun 9, 2015 3:38:26 GMT -5
JerryScript, ital, geh3333 so i put her all back together and i tried to start her but she would not start. I've changed a lot of parts and i put on the ncy 30mm carb as well. I am not sure if its a fuel to air ratio problem. I know the carb was empty of gas, but not sure how many tries would it take. I tried about 5 times enough to kill the battery and put my trickle charger on. anyway i am a noob at this. how many turns out should I set the air to fuel screw at first to get her started? If you cranked the scoot 5 times and the battery died , I'd say you really need to charge the battery. A weak battery will have issues starting a scoot with a bbk. I suggest using jumper cables , and hook her up to a car battery while you try to start her for the first time. It also may take more then the 5 tries to get the scoot started for the first time. Open the drain for the carb bowl , crank the scoot until you begin to see fuel running from the drain. Close the drain and go at it again , this way yozuz know there is fuel to the carb. |
|
|
|
Post by pistonguy on Jun 9, 2015 6:13:08 GMT -5
Ital, I'm not here to put you down or make you feel bad but just being honest, this Head work is a total Butcher job.
The Intake tract goes in then has Two Dip down dimples on each side of the Valve guide, This should be a Flat Transition into the Bowls, this will cause a Flow "Eddie".
The Exhaust has been Hogged out to wear the sealing ring for the header pipe is essentially gone. Will never get the header pipe to seal, The Head is now junk.
geh333 is correct in the Header Pipe Diameter will be smaller than the Exh. Port, Now the Head Pipe will restrict the entire flow.
Sorry for the news but Best of Luck
|
|
|
|
Post by geh3333 on Jun 9, 2015 7:50:48 GMT -5
Ital, I'm not here to put you down or make you feel bad but just being honest, this Head work is a total Butcher job. The Intake tract goes in then has Two Dip down dimples on each side of the Valve guide, This should be a Flat Transition into the Bowls, this will cause a Flow "Eddie". The Exhaust has been Hogged out to wear the sealing ring for the header pipe is essentially gone. Will never get the header pipe to seal, The Head is now junk. geh333 is correct in the Header Pipe Diameter will be smaller than the Exh. Port, Now the Head Pipe will restrict the entire flow. Sorry for the news but Best of Luck Yeah , from the pics it doesn't look good. It looks as if they used a dremmel and didn't even attempt to smooth out or polish the ports. When it comes to the exhaust port , I never use the donut type gaskets , just the full metal type gasket . it seems as if it seals just fine , but I'm not sure about the lines that were left on the face of the exhaust port. They might cause the Exhaust to leak. It sucks that even if you would want to use both exhaust gaskets, you will not be able to use the donut type. I hate sounding negative , but there is really no way around it. Who did you have do the head work ? I really hope the head works out for you and you don't have any problems . |
|
|
|
Post by cyborg on Jun 9, 2015 8:47:44 GMT -5
Ital, I'm not here to put you down or make you feel bad but just being honest, this Head work is a total Butcher job. The Intake tract goes in then has Two Dip down dimples on each side of the Valve guide, This should be a Flat Transition into the Bowls, this will cause a Flow "Eddie". The Exhaust has been Hogged out to wear the sealing ring for the header pipe is essentially gone. Will never get the header pipe to seal, The Head is now junk. geh333 is correct in the Header Pipe Diameter will be smaller than the Exh. Port, Now the Head Pipe will restrict the entire flow. Sorry for the news but Best of Luck OUCH!!!! this is from a guy that eats/breathes this stuff,,, |
|
|
|
Post by pistonguy on Jun 9, 2015 10:29:42 GMT -5
Touching on Polishing. I'll try to explain, excuse the verbiage may not be exacting.
On the Intake side we are working with Atomization, it needs to be left scratched up, Polishing will create a surface tension drag of the intake charge. You won't see a head from Mitch Payton to Robert Yates and all in-between with polished Intake Ports Two or Four Stroke.
A Shark skin is not Smooth, for it to create incredible bursts of speed it has a rough texture to break the surface tension of the water.
If ya just want to make something look pretty with 0 gain polish the exhaust port. Polish the Exhaust port ending with a Jewelers Rouge, She'll be Mirror finish but does "0"
|
|
|
|
Post by cyborg on Jun 9, 2015 10:39:40 GMT -5
my last three port jobs ,,,two being from zippers performance ,,,(a pretty successful high performance aftermarket supplier builder/developer with over 50 national titles under their belt) were finished with about a 220-280 grit look,,,i called them with concerns and they said "trust us this is the finish you want in a port,,, not polished for a normally aspirated machine",,,,i said you da boss,,,results were nothing short of spectacular
|
|
