Freshman Rider
 
Currently Offline
Posts: 63
Likes: 0
Joined: Apr 19, 2013 0:41:00 GMT -5
|
Post by metrodee on Aug 20, 2013 17:17:02 GMT -5
Just recently had work done to the scooter (as some already know). Last night I tried to replace the "straight-piped" exhaust with a new stock system, which was given a 6-point gutting.
Mounting the exhaust onto the header went fine. Then I put the nuts on and began tightening them down and SNAP! Now I'm trying to figure what would be the best method to address this problem.
I've removed the exhaust to prevent any possible "backup" into the exhaust port.
I'm awaiting a replacement Big Valve Head (because the one that was supposed to be installed was defective and returned)), so I'm currently using the stock one.
The studs broke off SLIGHTLY below the header pipe. It looks like they can be removed with a pair of vice grips. I was also wondering if bolts would be an appropriate substitute for studs.
Any help is appreciated.
|
|
New Rider

Currently Offline
Posts: 4
Likes: 0
Joined: Jun 18, 2013 16:21:19 GMT -5
|
Post by bisbonian on Aug 20, 2013 18:19:12 GMT -5
If you can twist the broken studs out with vice grips then do it.
Studs are better than bolts, less likely to strip the threads in the head.
|
|
|
|
Post by scootnwinn on Aug 20, 2013 18:22:39 GMT -5
Just replace the studs. Buy a torque wrench while your there you won't regret it..
|
|
|
|
Post by scoots on Aug 20, 2013 20:56:46 GMT -5
u said it was slighly below the pipe...thats a good thing use a GOOD pair of vice grips NOT a cheapy $5 from advancd auto trust me on that  |
|
Sophomore Rider
  
Currently Offline
Posts: 139
Likes: 0
Joined: May 7, 2013 21:44:09 GMT -5
|
Post by david3336 on Aug 20, 2013 20:59:07 GMT -5
i have got them out a few times with vise grips when pep broke them off. i would use the corect studs my self so not to strip out head. a small good pair of vice grips will get them out just make sure you got a good bite on the stud before turning you dont get many shots at it before there is nothing to grab. it is best to take head off so you got room to work
|
|
Freshman Rider
 
Currently Offline
Posts: 70
Likes: 1
Joined: Jul 29, 2013 12:23:27 GMT -5
|
Post by ckizer on Aug 22, 2013 0:23:15 GMT -5
Vice grips worked for both of mine. Odds are the 6mm screw hole will be stripped shortly too. So do this next:
I'm going to have my own redrilled to 8mm from the 6mm they are. However this trick works UNBELIEVABLE well for over 380 miles. Go into a real hardware store like do-it-best with your 6mm stud. Find a course american screw that's about the same size as your 6mm. Screw it into the slot and it will be tighter than your old 6mm until you can buy a new head or professionally drill 8mm holes. DO NOT USE a ratchet to tighten. I used a regular screw with a screwdriver and hand tightened.
|
|
Freshman Rider
 
Currently Offline
Posts: 63
Likes: 0
Joined: Apr 19, 2013 0:41:00 GMT -5
|
Post by metrodee on Aug 22, 2013 14:21:20 GMT -5
UPDATE:
Exhaust studs AND gasket replaced (removed the head to do this), and exhaust was mounted. However, despite the exhaust header being mounted firmly (as in properly tightened down to flush) with the engine, it's still loud, leaks, and backfires when the throttle is released.
New studs were properly mounted into the head, and valves were adjusted to .004 on E and I. The carb (already set at about 2 turns from previous work) was not tampered with. Bolts/studs were put back in the correct position and tightened appropriately.
What could cause the aforementioned issues?
|
|
|
|
Post by scootnwinn on Aug 22, 2013 15:00:35 GMT -5
What could cause the aforementioned issues? ...it's still loud, leaks, You answered your own question. Something didn't seat right... |
|
Freshman Rider
 
Currently Offline
Posts: 63
Likes: 0
Joined: Apr 19, 2013 0:41:00 GMT -5
|
Post by metrodee on Aug 22, 2013 21:27:49 GMT -5
[replyingto=scootnwinn]scootnwinn[/replyingto]After further inspection, that's exactly the problem. The header isn't sitting flush with engine, no matter how many times the nut's being tightened down. I'll have to make a slight modification so that the header sits flush with the engine BEFORE I tighten it down!  |
|
Freshman Rider
 
Currently Offline
Posts: 63
Likes: 0
Joined: Apr 19, 2013 0:41:00 GMT -5
|
Post by metrodee on Aug 27, 2013 6:00:09 GMT -5
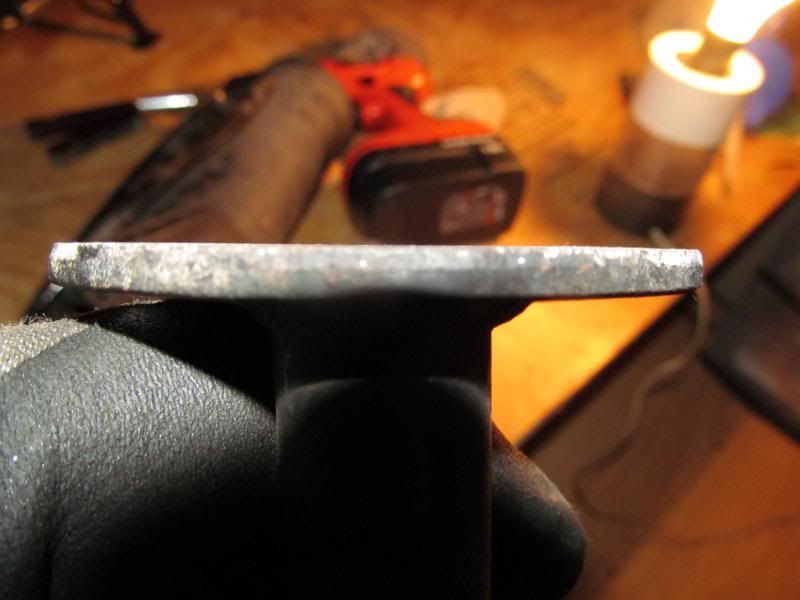
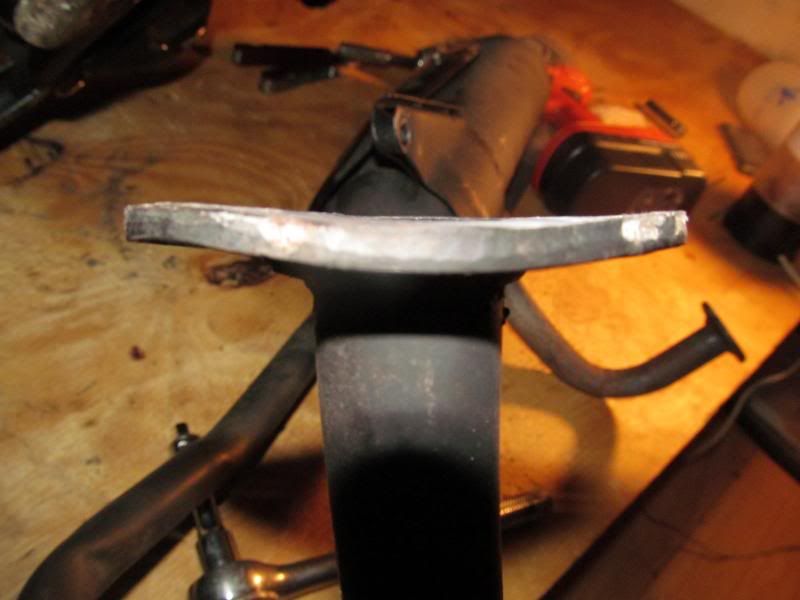
Found out EXACTLY what the pesky problem is. Turns out the header on the replacement exhaust was bent, causing it to NOT sit flush on the engine (and as such, the snapped studs and NOW the stripped ones that must be replaced)! Time to put the straight pipe back on! First picture is of the straight pipe header. Notice how this one is nice and flat. The second one is the replacement exhaust, which has a curved header that didn't allow it to sit flush and therefore giving me leaks and broken/stripped studs. Lesson learned!   |
|
|
|
Post by sailracer on Aug 27, 2013 8:58:06 GMT -5
I had a header pipe that looked the exact same way. It is very easily remedied. Get yourself a burnsomatic (or similar propane or Mapp gas) torch.or a plumber's sweat tank. Heat the flange red hot, and straighten it out. A couple of blows with a hammer, a pair of vise-grips to bend or a heavy steel plate to bang against should do it. Allow to air cool. Mine came out arrow straight  And most important----No leaks |
|

